|
|
TRex version 2.1.2User's Guide - Using TRex |
The first thing you need to do to take advantage of TRex is to fill
in your user information. You can do this by clicking on the
 button (User Info) on the top line of this
screen. You need to enter all fields
except for 'First and Last name', and 'Reply to'. If you are not in the
US, or your time zone is not offered on the User Info screen, talk to the
webmaster of the site you are using. Make sure you check
'delete mail from mail server' unless you want multiple copies of emails in
your Inbox.
button (User Info) on the top line of this
screen. You need to enter all fields
except for 'First and Last name', and 'Reply to'. If you are not in the
US, or your time zone is not offered on the User Info screen, talk to the
webmaster of the site you are using. Make sure you check
'delete mail from mail server' unless you want multiple copies of emails in
your Inbox.
Here is a brief description of what you can do with TRex.
 (Check Mail): Checks the POP mail account you
entered into TRex.
(Check Mail): Checks the POP mail account you
entered into TRex. (Compose): brings up a blank mail form which
can be filled in and sent.
(Compose): brings up a blank mail form which
can be filled in and sent. (Folders): shows details about your folders
and allows you to edit folder information.
(Folders): shows details about your folders
and allows you to edit folder information. (Address Book ): stores all of your contact
and group list information. Addresses can be added through a form at the bottom
of the address screen, or from any email.
(Address Book ): stores all of your contact
and group list information. Addresses can be added through a form at the bottom
of the address screen, or from any email.  (Search): allows searching messages with
certain criteria. (User Info): is used to enter user information.
(Search): allows searching messages with
certain criteria. (User Info): is used to enter user information. (Your Files): stores any files you need,
either from your computers drive or from an email attachment. These files can be
sent along with email or saved to your computer.
(Your Files): stores any files you need,
either from your computers drive or from an email attachment. These files can be
sent along with email or saved to your computer.  (User's manual): displays the on-line user's
manual.
(User's manual): displays the on-line user's
manual. (Logout): logs you out of TRex so your
messages cannot be read. You will need to re-enter your password to access TRex
after clicking Logout.
(Logout): logs you out of TRex so your
messages cannot be read. You will need to re-enter your password to access TRex
after clicking Logout.
 or
or  buttons (Move or Delete). If any of
the messages in the folder window are selected the arrow will point to
the folder window. If one or more messages are selected, and Move
or Delete is pressed, all selected messages will be acted upon.
Moved messages are removed from the current folder and sent to the folder
selected on the drop-down window. You can create a folder by selecting
'New Folder' and moving a message. Deleted messages are sent to the 'Trash',
unless they are already in the 'Trash', in which case they will be removed
altogether. If no message is selected in the folder window but a message
is being shown in the message window, then the arrow will point down and
Move
and Delete will act upon this message. If no messages are selected
and no message is being shown, then no arrow will be shown and Move
and Delete will not do anything. The
buttons (Move or Delete). If any of
the messages in the folder window are selected the arrow will point to
the folder window. If one or more messages are selected, and Move
or Delete is pressed, all selected messages will be acted upon.
Moved messages are removed from the current folder and sent to the folder
selected on the drop-down window. You can create a folder by selecting
'New Folder' and moving a message. Deleted messages are sent to the 'Trash',
unless they are already in the 'Trash', in which case they will be removed
altogether. If no message is selected in the folder window but a message
is being shown in the message window, then the arrow will point down and
Move
and Delete will act upon this message. If no messages are selected
and no message is being shown, then no arrow will be shown and Move
and Delete will not do anything. The  button (Go) changes the
folder window to show whatever folder is selected on the drop down menu.
Selecting show message in new window will open up each message in
a new window as opposed to the lower half of the main window, as is usual.
This allows more viewing area for some messages which may need it.
button (Go) changes the
folder window to show whatever folder is selected on the drop down menu.
Selecting show message in new window will open up each message in
a new window as opposed to the lower half of the main window, as is usual.
This allows more viewing area for some messages which may need it.
The top line of the folder window shows the folder name, along with folder summary information. Next to the folder is shown which message numbers are being shown in the window. Message numbers change depending on how the messages are sorted. Select All and Clear All select or unselect all messages shown on the screen for deleting or moving.
The Folder window shows up to 50 emails in the current folder. Information about each email is displayed, one email per line. If a line has a yellow color to it, it has not been read yet. Each line shows who the email is from, when it was sent, the subject included in the mail, and the size of the message (in Kbytes). If a green paperclip shows up next to the size then the email has an attachment included. Clicking on the subject displays the message. Clicking on the email address in the 'from' field begins a message to that person. Clicking on any of the headings sorts the messages according to that column.
Next Message and Previous Message change the Message Window contents according to the contents of the Folder Window. If the message displayed in the Message Window cannot be found in the Folder Window above, these functions will not work.
Clicking on Resend will resend the message without any changes. You will be prompted to input the name of the recipient and the mail will be sent verbatim, only changing the from and the date field.
Clicking on add addresses will check all email addresses in the header of the email and display a form allowing you to add any that are not already in your address book.
(Compose) button, and the next screen appears :

Here you insert the e-mail address of the destination (field To), a brief description of the e-mail content (field Subject), the recipients (e-mail address) that will receive a copy of this e-mail (field cc) and those recipients that will receive it too but neither the destination nor the ones that will receive a copy will be notified (field Bcc or blind copy).
After that is a big field that allows you to write you e-mail message (please keep in mind that at this time TRex allows text-only messages). Once this is complete you can send your e-mail pressing the Send Mail button.
Now you can be considered the happiest person in the world, because thanks to this e-mail you started a business, a new relationship, or perhaps sent a love letter to your loved ones, and as soon as you press Send Mail that huge spelling error appears in front of you ... it's too late, the e-mail has been sent sucessfully !!!
To avoid such embarasing situation there is one tool that you will love: the spell checker. Based on aspell or ispell (the one that is installed in your system) you can check if the words on your e-mail are properly written. To do this just select the proper language to use (the drop down list at the left of the Send Mail button) and press the Spell Check button. At this time a new one will appear, showing the original text with the words found to be wrong specially marked. I this first example the word night was mispelled, and the spell checker suggest some words that could replace it :

Also you can see two more items in the list, whose meaning is :
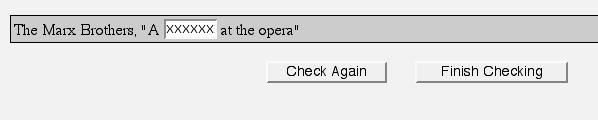
Once all errors are corrected, and you press the Finish Checking button, you corrected text is passed to the compose window.
This is only a warning, and in case can cause any harm you will be notified explicitly.
User Info
and at its bottom press the Maintain Dictionary button) :
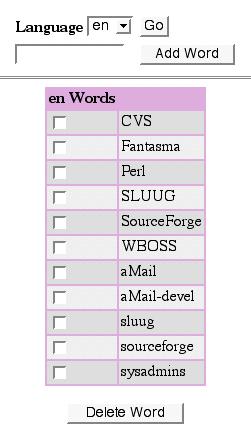
In this screen you can work on addig and/or deting words from your personal dictionary.
Note: please note that you will have one personal dictionary per language, which can be selected from the drop down list at the top and pressing the Go button.
|
|
TRex version 2.1.2User's Guide - Using TRex |